
One of the best and easiest ways for how to speed up your website and even rank better in Google is to utilize caching on your website. One of the appeals of WordPress to run your website is that you don’t need to be familiar with coding or anything technical, and the same is true to enable caching using a plugin.
Consider this WordPress caching guide to significantly speed up your website.
WordPress Caching Guide
What Does a Caching Plugin Do
Let’s start by answering the most important question: what does a caching plugin do?
A caching plugin adds lines of code to your site’s htaccess file. This file communicates to the browsers of the people who visit your site with instructions on how to load the site and its elements.
If someone has previously visited your site, most of the elements will be stored in their browser history. If this is the case, a caching plugin effectively tells the browser which elements it needs to load fresh.
Most of the elements which make up your site do not change over time. This means that your visitor’s browser can just pull most of what it takes to load your site from its memory.
Communicating with your website’s server to load the site is what accounts for most of the load time.
Therefore, the less someone needs to load when they access your site, the faster it can load.
As more web traffic is comprised of mobile users, load speed is becoming an increasingly important ranking factor. As I explain in my overview on how to check your website’s speed, you can use can measure your site’s speed with a few free tools, including Google’s PageSpeed Insights.
That tool in particular will recommend steps you can take from Google itself to improve your site’s load time. Because this affects the user experience of your website, it’s has a bearing on your rankings in general.
All things being equal, a faster loading site will always outrank a slower site. A caching plugin can help with this with minimal effort on your part.
WordPress Cache Settings
The best WordPress caching plugin will vary depending on who you talk to, but the most popular free caching plugins once installed and enabled should all have a big impact on your site’s load time.
Let’s go over a few of the WordPress cache settings to consider, and a bit on what each of them mean.
I’m using W3 Total Cache on this site, so any screenshots will be from it, but virtually any caching plugin will address these settings.
Page Cache – Enabling this enables caching to begin with. In W3, you can pick and choose the types of page content you want cached, set refresh times, etc.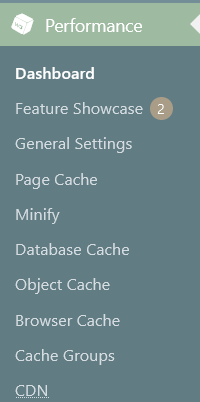
Minify – Enabling “Minify” eliminates white space in your CSS, HTML, JS, etc. The result is that there’s less for the browser to read and load, making your site load quicker.
Ideally your site’s theme is already optimized and doesn’t have excess white space, but this makes sure of it without causing any issues.
You can pick and choose which scripts and types of code you minify with W3.
Database Cache + Object Cache – These sections relate to the database of your site, or where the content of your site like your posts and pages are stored.
Enabling caching here makes it so that anytime you or someone searches your site’s database return results more efficiently/quickly.
Browser Cache – In addition to being able to add expires headers here, the “Browser Cache” section is where you can set time limits on various types of content before they refresh.
This is what your visitor’s browsers use to determine what saved content from a previous visit it can serve up and which it needs to load fresh.
You can set different time limits for different types of content. CSS and JS, for example, typically don’t change on your site over time.
The default refresh time for the CSS and JS content on your site is set to 31536000 seconds; the equivalent of one year.
This means that if someone visits your site and returns within one year, their browser won’t need to load your site’s CSS and JS from your site’s server.
Regarding the best WordPress caching settings, like the majority of settings found in W3 or whichever caching plugin you utilize, the default settings for the various content types will be suitable for most sites.
Just make sure that you have actually enabled caching via the plugin if it requires it/doesn’t come by default.
CDN – CDN stands for “content delivery network”.
As I stated earlier, much of the loading time for your website comes from your visitor’s browser having to communicate with your server.
The farther that visitor is on Earth from the server your website is stored on, the longer it takes to transfer that data.
Utilizing a CDN, cached versions of your website are created and stored on servers located around the globe. When someone tries accessing your website, it will automatically load from the closest server geographically to them.
This significantly reduces website load time, and as a result CDNs are typically recommended.
While free caching plugins don’t generally provide CDNs for your, they integrate with an existing CDN if you have one already tied to your site.
The result is that your site loads much faster for that person which enables the site to load faster.
What Does Purge Cache Do in WordPress
Anytime you make aesthetic or other behind the scenes tweaks to your website, it’s a good idea to purge the cache.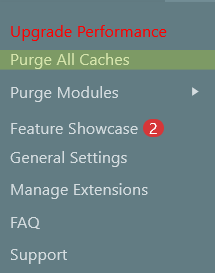
This is because, while HTML which makes up the content of your new posts gets updated frequently in browsers, CSS and JS code has a much longer refresh rate.
By their nature, CSS and JS code are much more static, so much so that caching plugins typically instruct browsers to only load that content fresh after a year.
Purging the cache forces the site to load fresh in a browser so that you and your site’s visitors are guaranteed to see the updated version.
This is something to keep in mind when you’re not seeing the changes you expect after you activate or de-activate a plugin, for example.
Without a caching plugin, this won’t be an issue. With the caching plugin installed, you likely will be seeing the older cached version of your page with no changes to the code which the new plugin or changes you’ve made affected.
Purging the cache will correct this.
Opening your site or the specific page you’re not seeing the changes reflected to in a private browser effectively does the same thing because in a private browser, no cached information is found/loaded, so the site loads clean every time.
In Summary
- Enabling caching in WordPress makes your site load faster for repeat visitors by allowing their device to load most of your site through a previously saved cached version in their internet browser.
- Enabling caching via a plugin is the fastest and easiest way to speed up your site.
- This will earn you a better speed score from Google, improving your rankings.
- The default plugin settings will work well for most web sites.
- Clearing or purging the cache in WordPress forces all visitors’ browsers to load the entirety of the site fresh the next time they visit.
Hopefully this WordPress caching guide has given you a better understanding of how caching works, why it’s important, and how to do it on your website.