
In the past, I’ve talked about how you can use DKIM and SPF authentication to avoid the spam filter when sending emails to clients. These are records which authenticate emails sent from your domain in the eyes of Gmail, Yahoo, etc. They add some encrypted data which verify that the emails actually came from your website, something scammers can’t easily replicate.
Today we’re going to take this idea one final step further and talk about how to setup a DMARC record which works hand in hand with the previous two records.
What is a DMARC Record
DMARC stands for “Domain-based Message Authentication, Reporting, and Conformance”.
Creating a DMARC record for your website states your email domain’s policy as it relates to the aforementioned DKIM and SPF authentication records.
Essentially it instructs email clients on what to do with emails from your domain in the case that DKIM and SPF records cannot be authenticated.
The important aspect of a DMARC record is choosing how strict your policy is, and it falls into three different categories: none, quarantine, and reject.
Why Use a DMARC Record
Let’s say a scammer sends an email which APPEARS to be from your domain to someone’s Gmail address.
In this instance, the email would lack the encrypted signs of DKIM and SPF authentication (assuming you set them up like I show you here).
With a DMARC record in place, we’re dictating to Gmail what to do with that email based on which setting we set for that record (none, quarantine, and reject).
- “None” means that there’s no rule set and Gmail can do whatever it sees fit with the email, whether that means delivering it to the inbox, the spam folder, or rejecting the email altogether. It’s essentially the same as not even having a DMARC record.
- “Quarantine” sends that email to the spam folder of the recipient.
- “Reject” denies the email from going into any folder in their mailbox.
Creating a DMARC record for your website is wise because it shows accountability in that you take security as it relates to your emails from your domain seriously.
It also ensures that scammy emails you didn’t send won’t get into anyone’s mailbox (in the case of using “reject”).
It’s easy to create, so let’s talk about how to setup a DMARC record.
How to Setup DMARC Record
The easiest way and the one I recommend for setting up a DMARC record is via your cPanel of your hosting.
Step 1 – Click Zone Editor in cPanel
On the main screen after logging into cPanel, click on “Zone Editor”. It’s under the “Domains” section, or you can just search for it using the bar at the top.

Step 2 – Click “Manage” Next to the Domain You Want to Make the DMARC Record For
Now find the domain you want to make the record for, and click “Manage”. Ignore the “+ A Record” button, the manage button will give us a more specific option on the next screen.
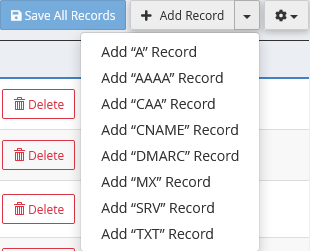
Step 3 – Click the Dropdown Arrow Next to “Add Record” and Select “Add ‘DMARC’ Record”
While you can do it another way, cPanel has a shortcut solution to make a DMARC record for so it’s all made for you outside of the Policy which you can choose in the next option.
Step 4 – Configure and Setup Your DMARC Record
There are a lot of settings here which can feel overwhelming, especially when you drop down the “Optional Parameters” menu.
Here are my recommended settings:
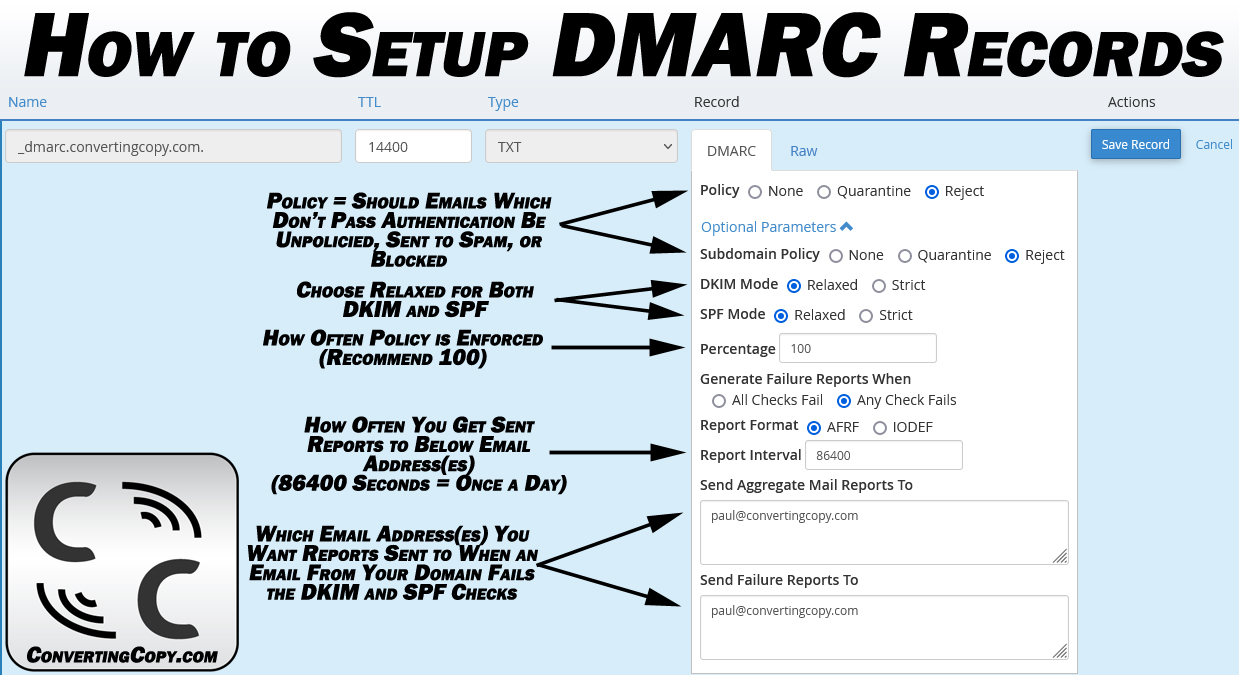
- Policy – I recommend “Reject” to keep emails from your domain which you haven’t sent from ever reaching someone’s mailbox.
- Relaxed Vs Strict DKIM and SPF Modes – I recommend “Relaxed” for each of these as these relate more to the reading of these records and don’t add any extra security on “Strict” mode.
- Percentage – I recommend 100 for the percentage as this ensures every single scammy email will be treated the same way in accordance to your policy.
- Otherwise I like the default 86400 seconds (one day) for reporting interval and just put your email address you want reports to get sent to when an email from your domain doesn’t pass.
The reports are helpful because they either let you know that someone is trying to use your domain to scam someone via email OR they lets you know that an email you yourself sent didn’t get delivered properly due to an issue with either your DKIM or SPF record.
In the case of the latter you can look into the issue and quickly resolve it.
Be sure to wait to setup your DMARC record for your domain until after you’ve created your DKIM or SPF record and can confirm (typically via your cPanel) that both have taken effect.
Setting up your DMARC record before your DKIM and SPF records are properly working will mean that emails you send will be rejected as those records cannot be verified.
Really this is just evidence that the DMARC record is working properly.
Lastly, setting up a DMARC record for your domain means that you are taking responsibility for your website’s security when it comes to email.
While some webmasters fear this might inadvertently hurt their email deliverability, it actually IMPROVES email deliverability.
It does this by eliminating emails from your domain you didn’t send, so your website’s reputation won’t be sullied in the eyes of Gmail, Yahoo, etc. by the spam of scammers.
This keeps the emails which YOU send from your domain in the inbox of your subscribers and clients and out of their spam folders.